

Read the first post in this series here.
So…Hi-Point. They are often maligned because of their looks and price point. Something so inexpensive that looks like that can’t perform well, right? But Hi-Point was never aiming to make the finest firearms out there, with a price to match. No. Their goal is to offer practical firearms for the blue-collar American workers. And I believe they’ve largely succeeded in that mission. But today’s focus isn’t on the company’s outlook, but on whether or not the product they make lives up to that promise.
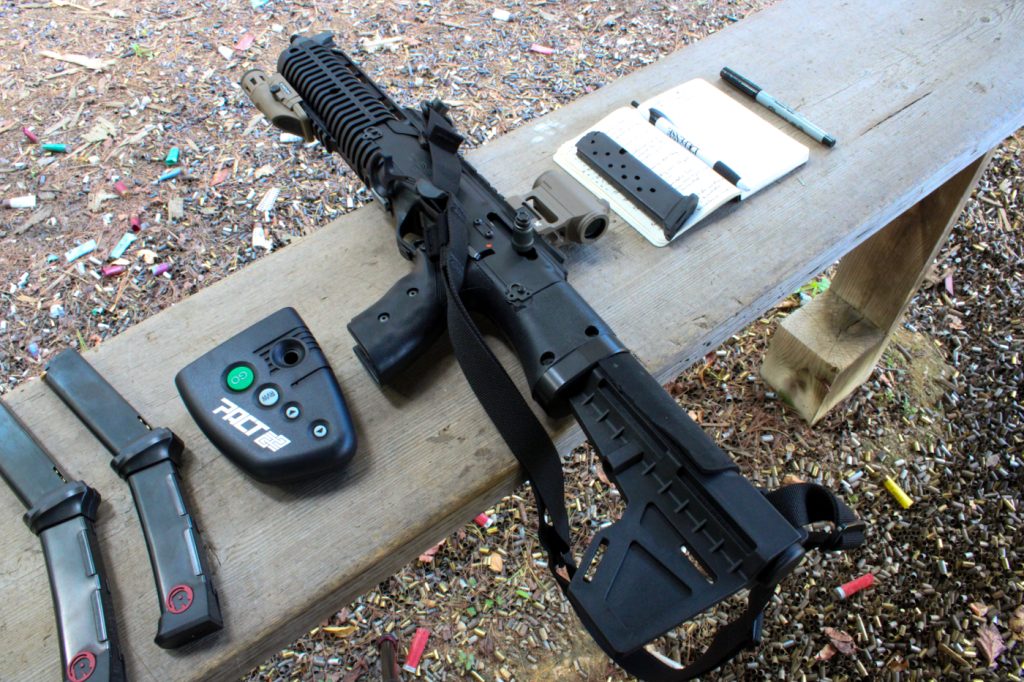
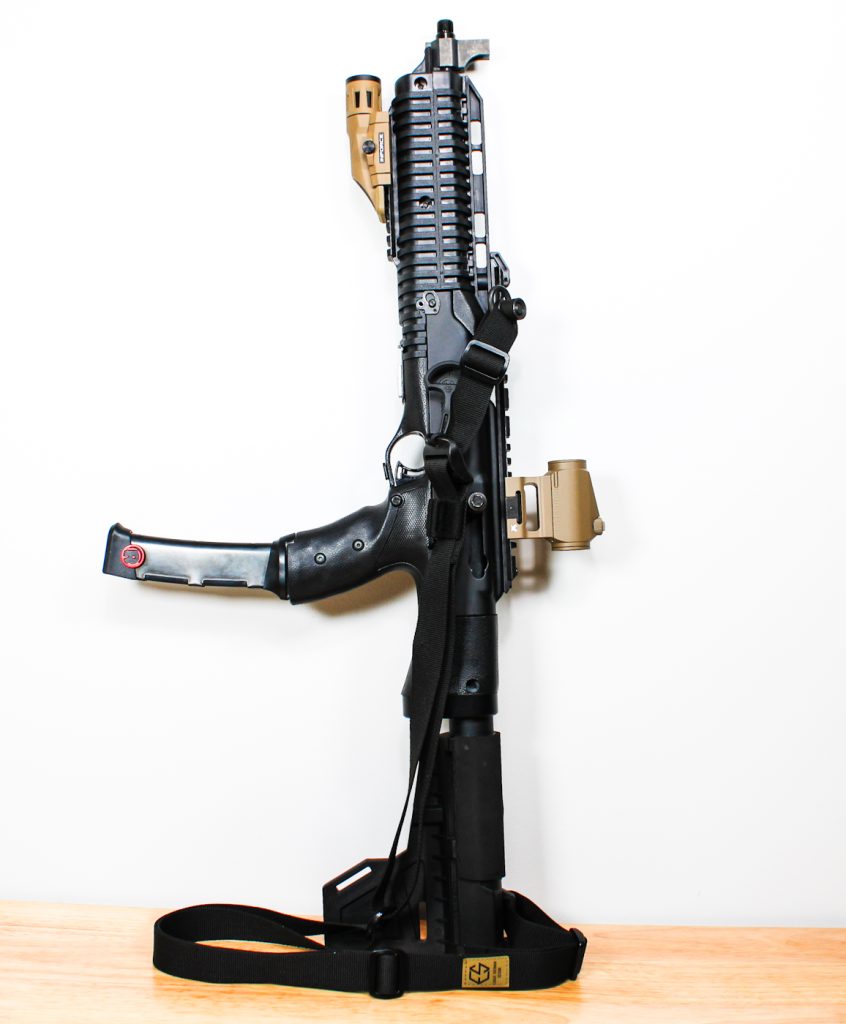
In the previous article in this series, I offered my initial thoughts on the Hi-Point 995P—a large-format pistol variant of the standard 995. I thought, based on the price and feature set, that this could be an excellent choice for use as a truck gun. However, the pistol had some misgivings, mainly involving sights and the recoil impulse. So today’s article will cover how I plan to build out the 995P for its intended use, run it through drills to see how it performs, and then give you my parts thoughts on the firearm. Let’s begin.
Loadout
Listed below are the products I selected to turn this base firearm into a more adept truck gun.
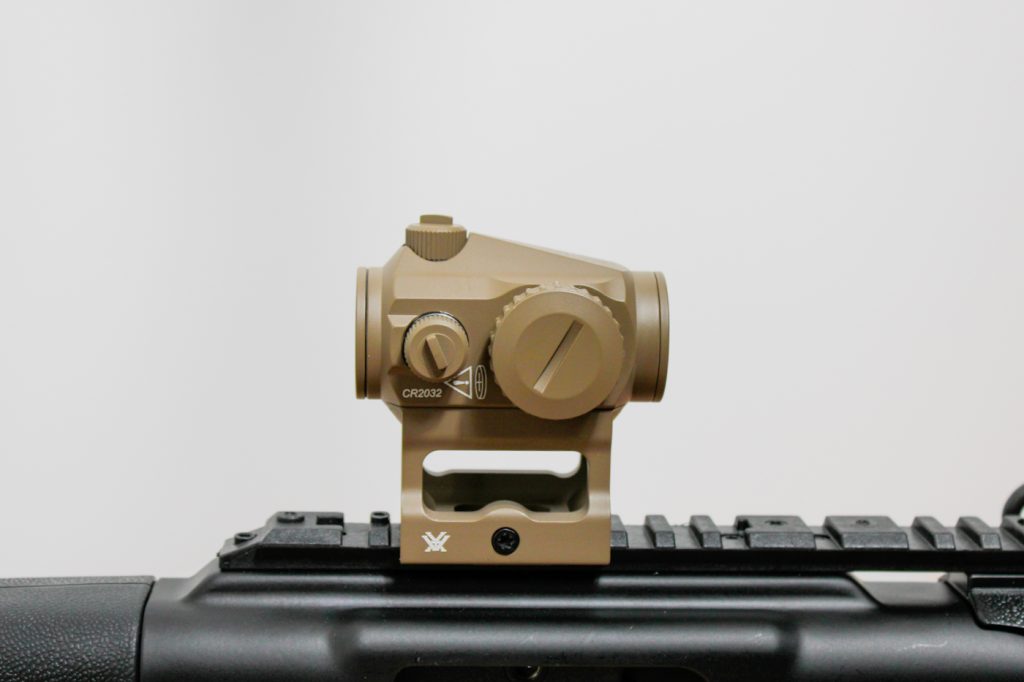
- Optic: The first concern is the easiest to fix—sights. For this, I simply removed the rear sight fixture and the front sight body. It was straightforward—just three screws and a bolt. Now, I have a clear top rail and an unobstructed sight picture. Since this is a budget rifle, I chose to add a Vortex Crossfire Red Dot in tan to add a bit of flair. The optic is simple and can usually be found for less than $150. I’ve used them on a host of different firearms—from 22s to 12-gauge shotguns—and have never had an issue. They have simple controls and are easy to use. They match the utilitarian approach to the 995P.
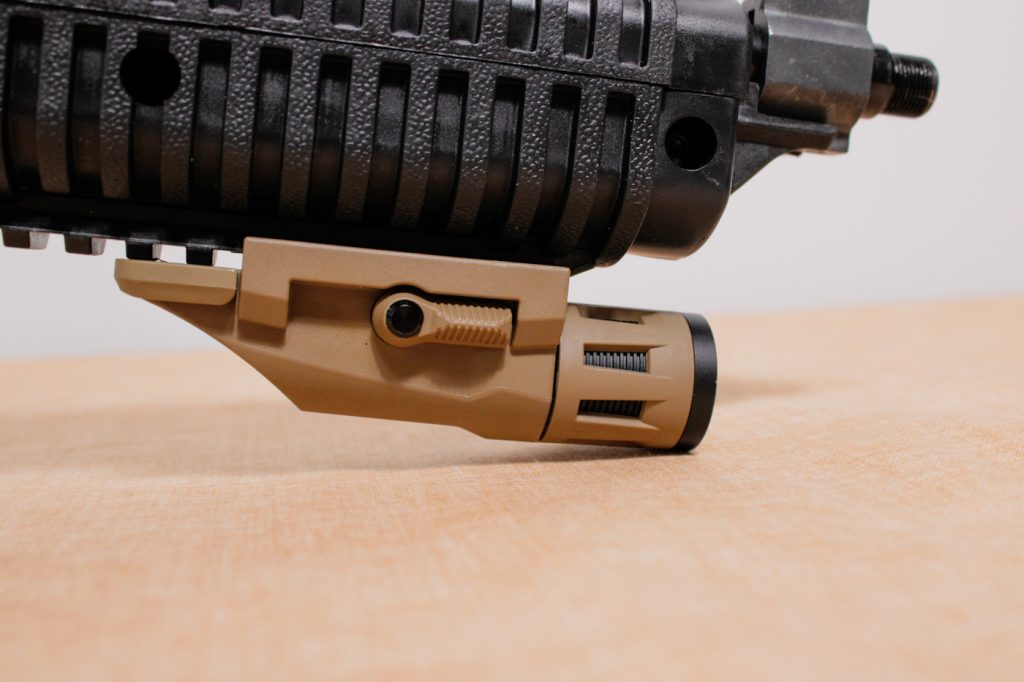
- Light: No defensive weapon is considered complete without a quality light. And again, I went with something affordable and selected an Inforce WML. These generally hover around $120, but again, you can find them even cheaper if you look hard enough. Instead of operating a click button or pressure switch, it has an integrated angled pad that can cycle through several modes, including momentary, constant, and strobe. For the 995P, I have it mounted on the bottom pic rail and then operate it with my off-hand pointer finger.
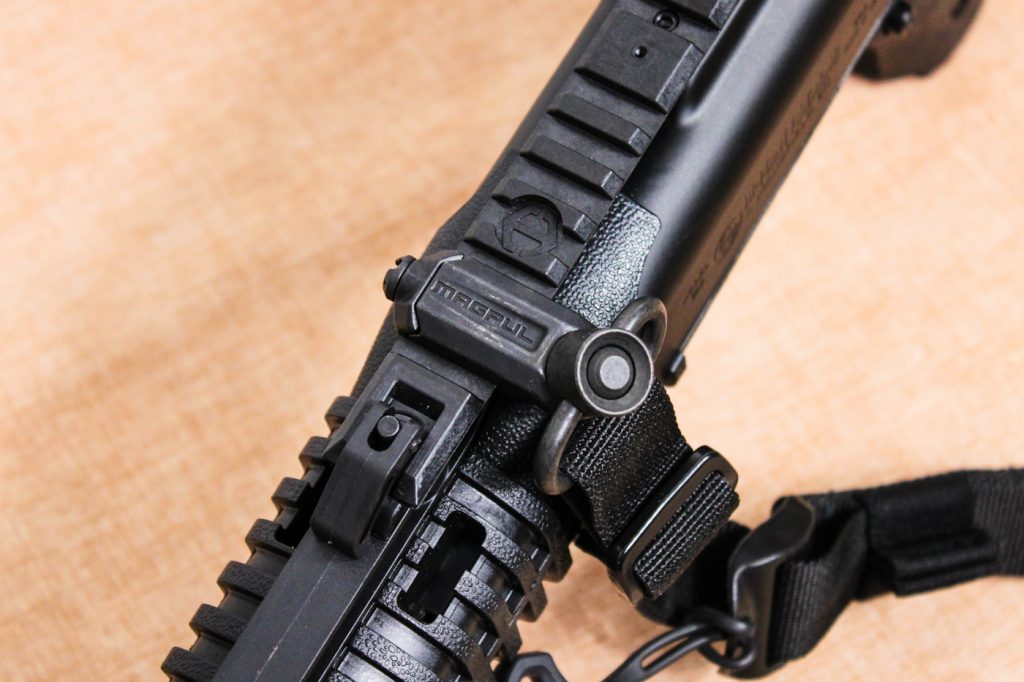
- Sling: Again, the goal was to go with something simple and reliable. For the past two years, I’ve been using Edgar Sherman Design ESD Sling on almost all my rifles. They are light, easy to operate, and cost about $50. The rear of the sling is connected through a sling slot on the brace, while the other is connected via a Magpul QD pic mount on the top rail, forward of the sight. A little unconventional, but it’s effective.
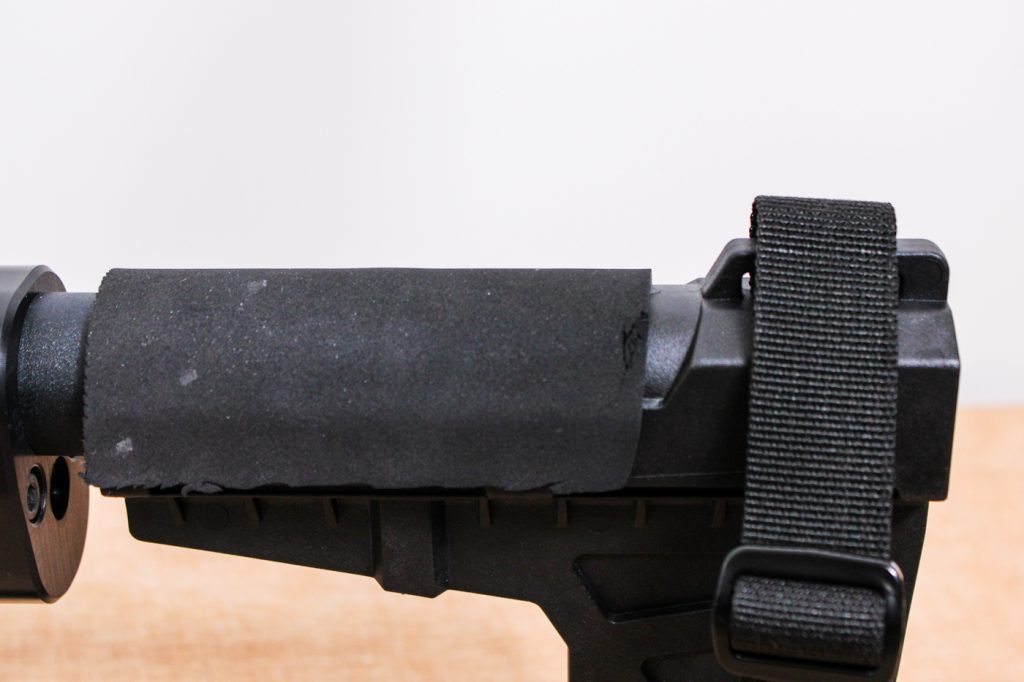
- Cheek Pad: I had no idea if this was going to work, but it was cheap on Amazon. I cut it to shape and then adhered it to the top of the brace. Mainly to add a bit more comfort.
Drills
Since I added an optic, the first task was to sight it in. I usually sight in PCCs at the 25-yard range and then check my holds at near ranges. Drills and testing were completed with Winchester 124-grain NATO ammo. All times were taken using a Pact Club Shot Timer 3. Testing took place over two range sessions at the Kelbly Rifle Range. Here are some thoughts on those drills:
- Accuracy Test: Perhaps the most surprising aspect of the test. Accuracy was done from a bag at 25 yards—first, ammo statistics.
| Winchester 9mm 124-gr NATO (15 shots) | ||
| Avg Velocity (FPS) | Extreme Spread | Standard Deviation |
| 1360.5 | 54 | 14.6 |
![]()
Of the 9mm I’ve tested, the Winchester NATO ammo has been the most consistent. Sight in was easy. My best 5-shot group at 25 yards measured at 1.2 inches. Which, given it’s a PCC with a red dot, I’m more than pleased with that.
- Bill Drill: Below is a chart of Bill drill splits and times. A couple of notes: everything ran fine with the 10-round magazine. However, the 20-round extended magazines experienced a few failures to feed when running the gun fast. Ultimately, I switched to running the 10-round magazine exclusively. When running these drills, the trigger was a hindrance. It has a slow reset, and a long pull forces you to be deliberate with it. That’s why, in two of the tests, the first shot was long—I short-stroked the trigger and tried to reset too quickly. Accuracy was fine. I had 2-pulled shots when I double-clutched the trigger.
| Bill Drill–7 yards, 6–shots | ||
| Test # | Time | First Round Split |
| 1 | 1.31 | 0.31 |
| 2 | 1.43 | 0.29 |
| 3 | 1.74 | 0.81 |
| 4 | 1.67 | 0.74 |
| 5 | 1.58 | 0.44 |
- Mozambique Drill: For those unaware, this drill involves two shots to center mass and one shot to the head. Again, similar issues as before, but this time, I expected them. Accuracy on this drill was impressive. It takes time to get familiar with the weapon.
| Mozambique Drill–7 yards, 3 shots | ||
| Test# | Time | First Round Split |
| 1 | 1.18 | 0.43 |
| 2 | 1.01 | 0.46 |
| 3 | 0.86 | 0.27 |
| 4 | 0.96 | 0.46 |
| 5 | 1.1 | 0.44 |
| 6 | 0.88 | 0.38 |
| 7 | 1.06 | 0.49 |
- 1-Shot From Low Ready: This is a speed drill. The goal is to be fast and accurate. A-zone (or center mass) hits are the goal. Again, happy with the accuracy, and I had a good feel for the trigger. So, positives.
| 1-Shot From Low Ready–7 yards | |
| Test # | Time |
| 1 | 0.23 |
| 2 | 0.22 |
| 3 | 0.34 |
| 4 | 0.34 |
| 5 | 0.31 |
| 6 | 0.39 |
| 7 | 0.22 |
| 8 | 0.32 |
| 9 | 0.31 |
| 10 | 0.27 |
| Avg. | 0.295 |
Parting Shots
After drills, what do I think of the gun? Is it something I’d genuinely recommend? The blowback action still produces that signature thump, but with the red dot sight and sling attached, transitions were seamless, and repeat shots were quick enough—the trigger takes time to get used to. It remained reliable during extended sessions with both FMJ and defensive rounds, outside of a few issues with the extended magazines (and only when trying to push the weapon). Overall, solid performance.
The addition of the cheek pad improved comfort and worked better than I expected. While it doesn’t look pretty (I’m a writer, not an artist), it’s functional.
Zooming Out
But do I recommend the gun? I saw this remark in the comments section, and I thought it succinctly answered this question (yes, I read the comments):
“If you want a low-budget gun that’s an actual low-budget gun with no pretense of being anything but a budget gun…this is for you. This is one case where the term ‘budget’ seems to have been an actual design feature criteria, and they did not deviate one little bit from that criteria.”
That comment sums up all my thoughts on the Hi-Point 995P. It is a budget gun and doesn’t pretend to be anything else. But as a budget gun, it works. While it definitely has its shortcomings (sights, felt recoil, and trigger), it does everything it needs to. But honestly, I’d probably go for the standard model 995. The recoil absorption stock is superior, making it a more comfortable rifle to shoot. But that’s for you to decide.
Read the first post in this series here.